• Home
  • About the Foundation
    • Volunteer Opportunities and Jobs
    • Donate Now
  • Visiting the Museum
  • Stone House Restoration Project
    • History of Ownership
    • Hybrid Drawings
    • Dendrochronology Study of the Log Addition
    • Behind the Plaster
    • Archeology
    • Progress Updates
  • Town History
    • Beginnings, 1732-1783
    • Growth, 1784-1860
    • Civil War, 1861-1865
    • Reconstruction, the Railroad and a Name Change, 1866-1899
    • The Twentieth Century and Today
    • People of Our Past
    • Primary and Secondary Sources Consulted
  • Publications
    • Images of America: Stephens City
    • Two Peoples, One Community: The African American Experience in Newtown (Stephens City), Virginia, 1850-1870
    • History of Orrick Chapel Methodist Church
    • Early Days and Methodism in Stephens City, Virginia
    • Life of a Potter, Andrew Pitman
  • Educational Programming
    • Old Tools as Simple Machines
    • The Great Wagon Road and Westward Expansion
    • Objects as Primary Sources: Historical Detective Work
  • Virtual Exhibits
    • Pandemics in New Town
      • The Worst First: Novel Plagues Hit America (1492-1758)
      • Running to the Hill: Smallpox and Sanitation in Colonial Times (1758-1760)
      • Another Scourge Among Many: Epidemics in the Civil War (1861-1865)
      • The Spanish Flu: The Story of Gervis Lemley (1918-1919)
      • It Didn’t Fade: Mildred Lee Grove and Tuberculosis (1930s-Late Twentieth Century)
  • Event Calendar
  • Related Sites & Institutions
  • Membership
    • Membership Application/Renewal
  • Contact Us
  • Try Our Tour App

Newtown History Center

Explore the 2nd Oldest Town in the Shenandoah Valley

Porch Posts and Windows

October 8, 2025 By Admin

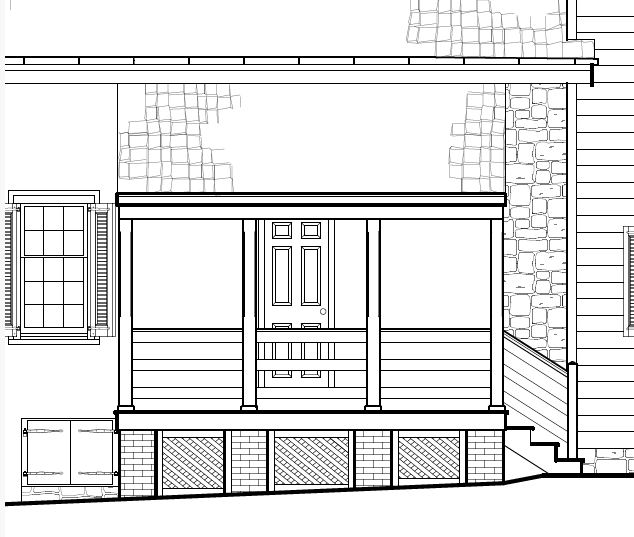
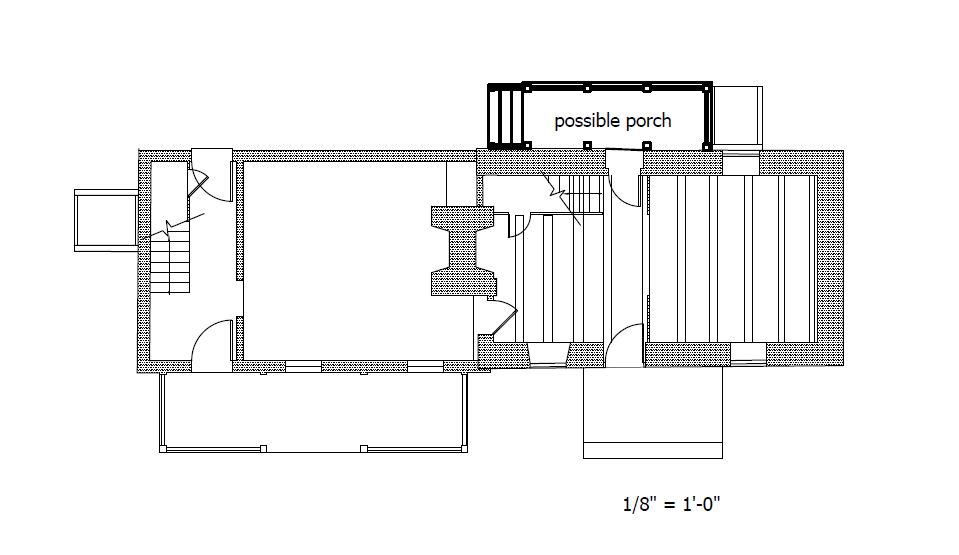
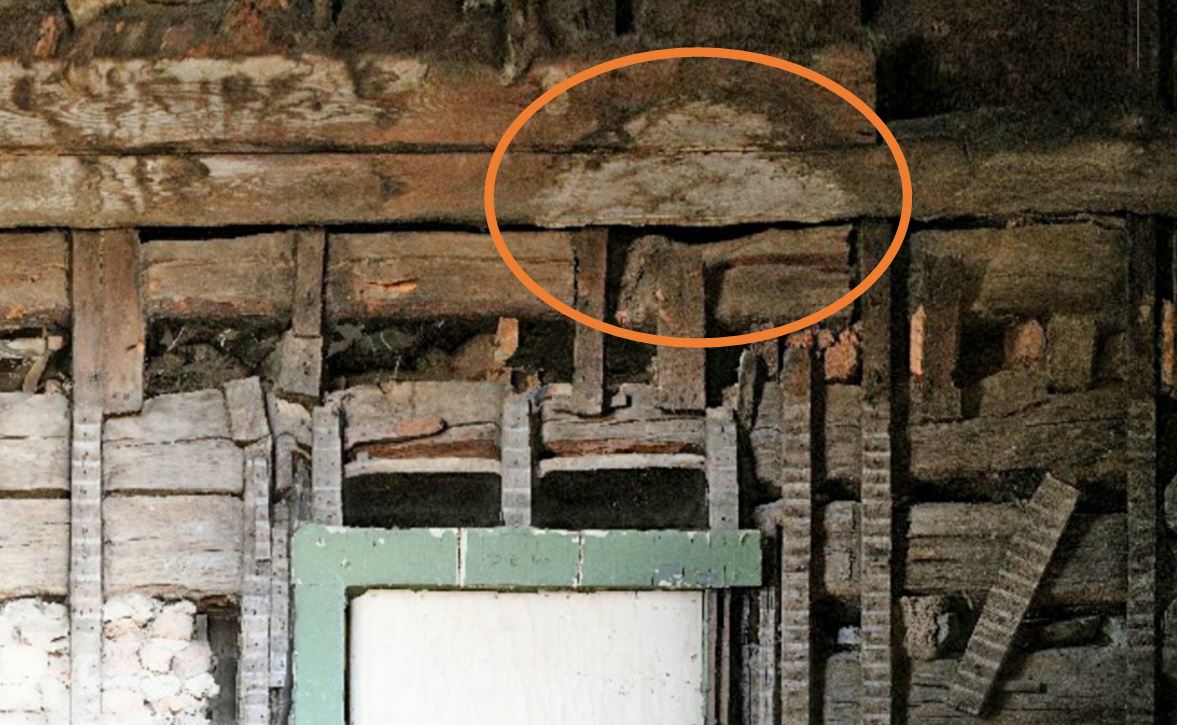
The questions we have struggled to answer as we develop the exterior restoration plans for the Stone House concern design details. Most of the time the original evidence was destroyed long ago, and we are only left with surviving examples in other structures of the period or historic images. Sometimes we get lucky. We previously have discussed the miraculous survival of the beaded weatherboards attached with original hand-forged nails under the roof of the circa 1869 shed addition behind the log side of the house. They told us how the log side of the house was sided in the 1830 period. Those weatherboards were coated in whitewash, except in one area above the rear doorway in the northeastern corner of the log addition. There the whitewash had been eroded away, leaving the outline of the apex of a gable roof for a porch that once covered the doorway beneath. (See area circled in image below.) We plan to reconstruct the porch based on this evidence. One of the design detail questions we have had to answer is what the posts for this porch roof looked like.


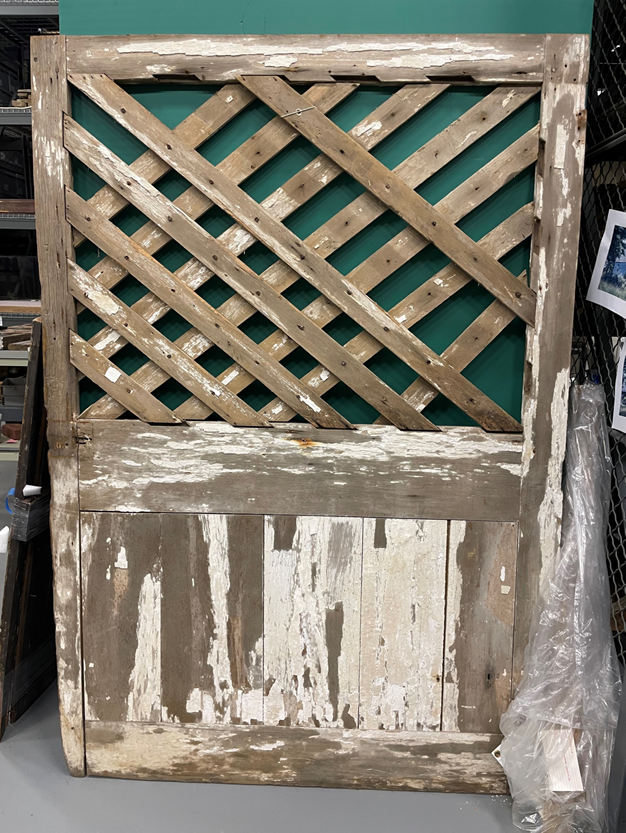
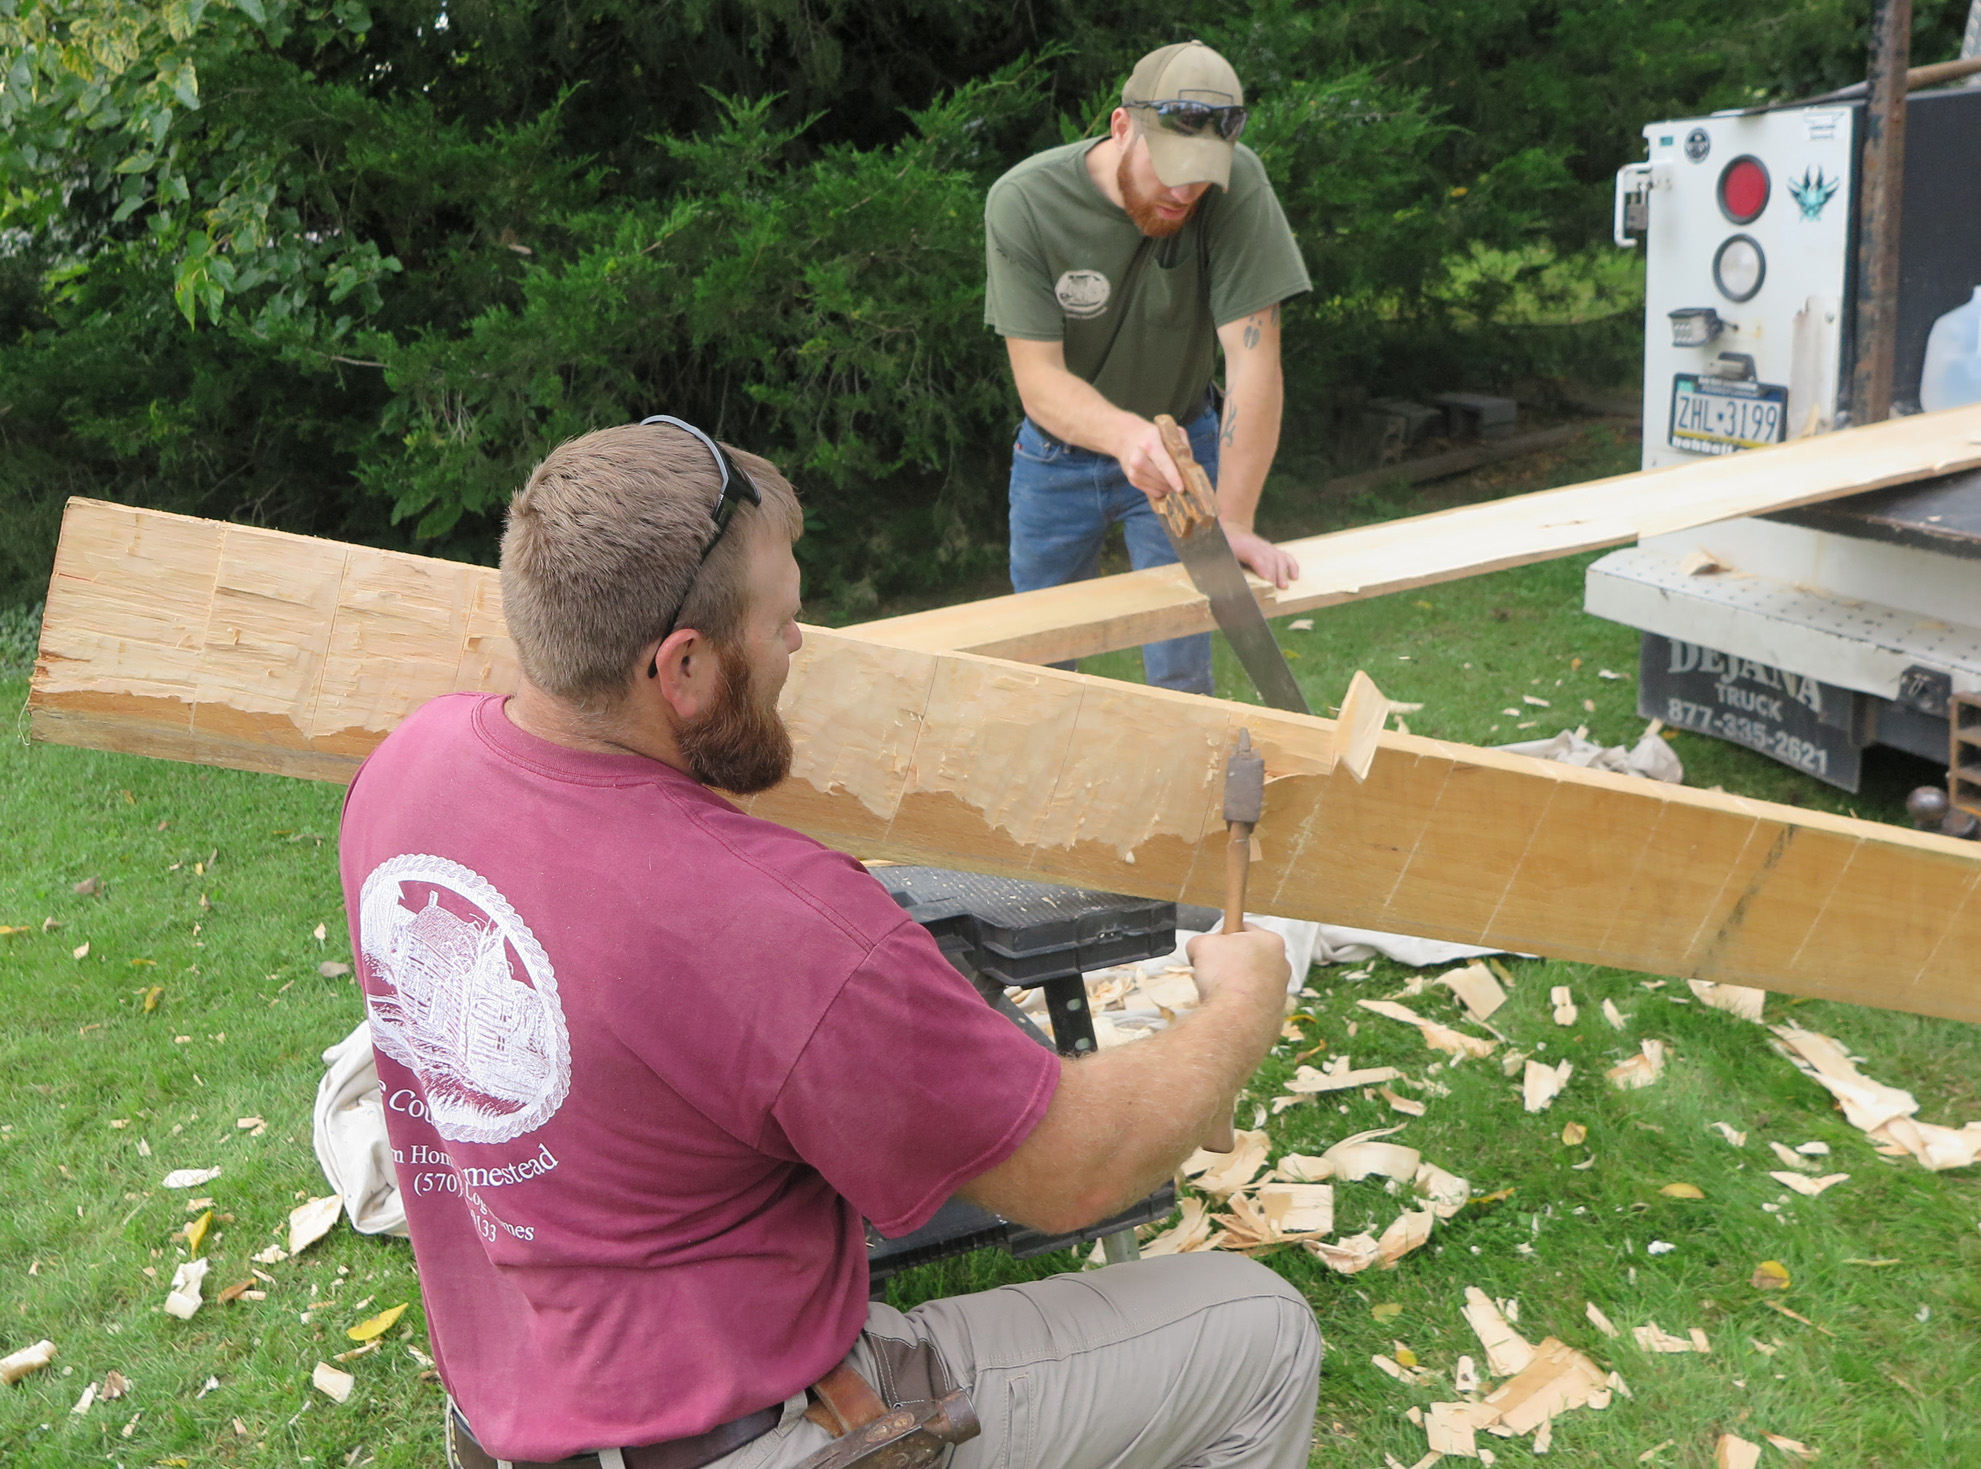
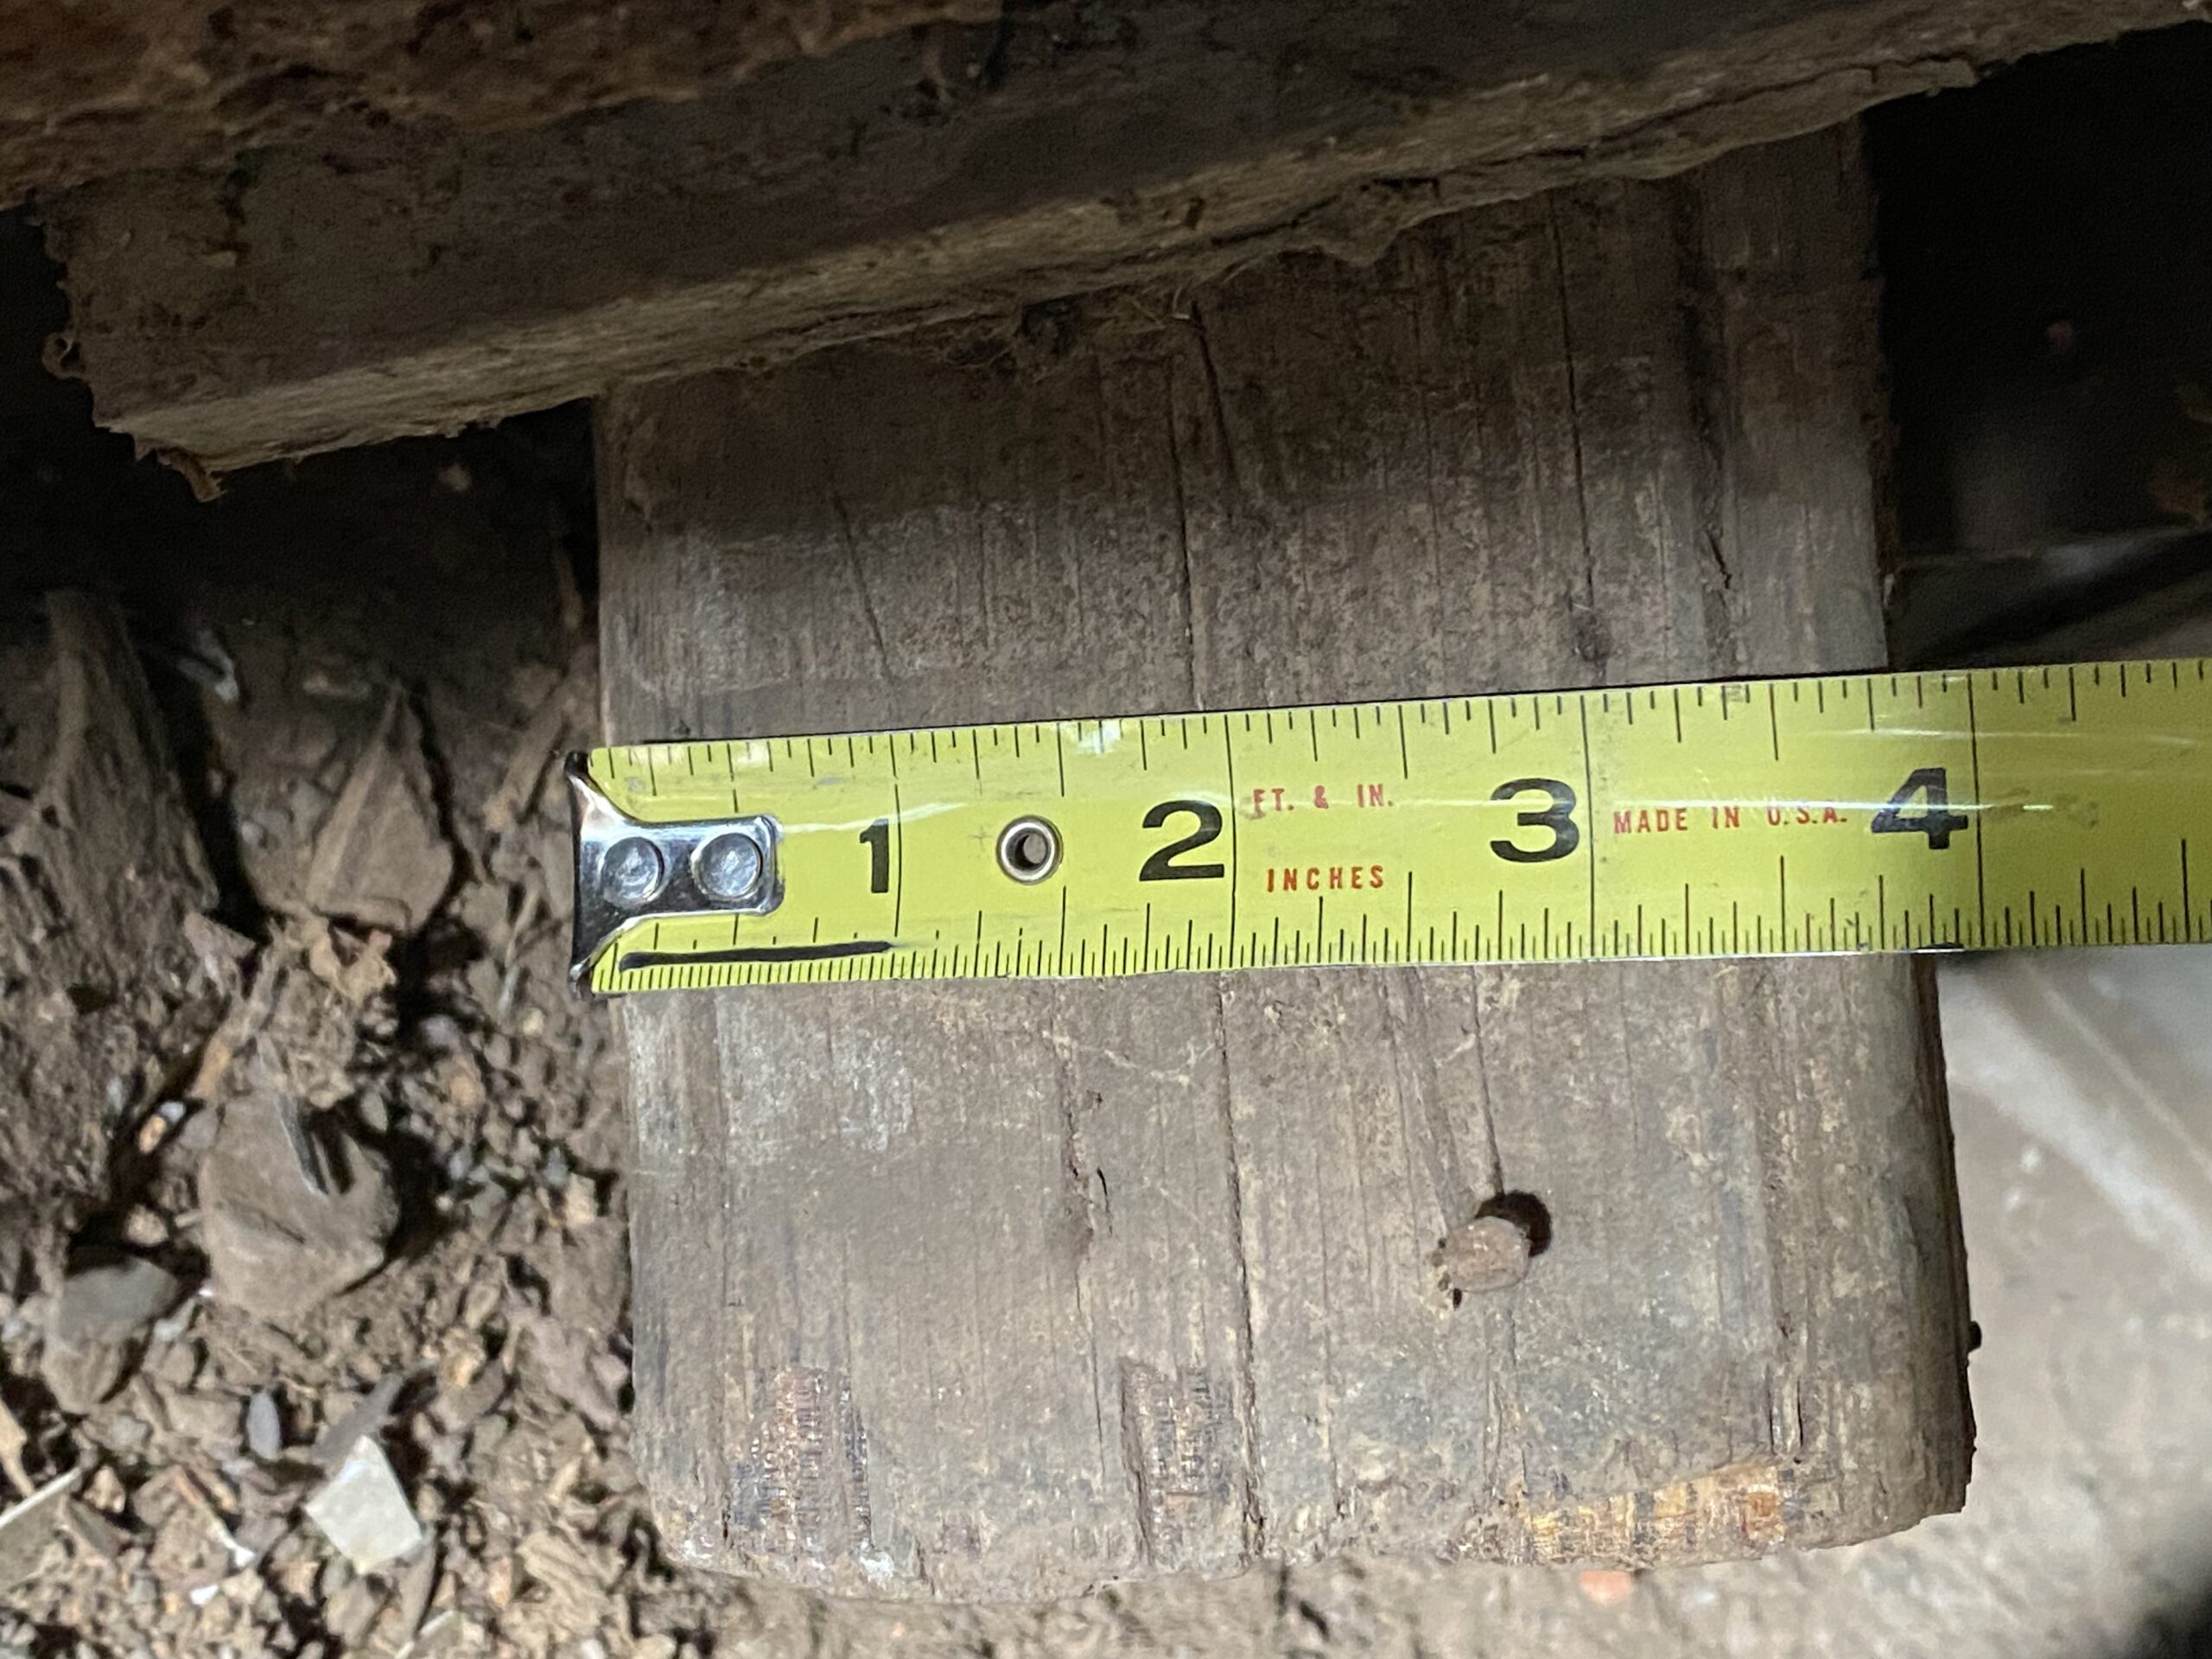
Here is another example of how we got lucky. While we were carefully dismantling the shed addition behind the log side of the house, we discovered that an old porch post had been recycled and used as a wall stud in that shed addition. (See image below.) It appears that when they demolished the rear porch to make way for the shed addition, the builders took one of the posts from the porch and incorporated it in the north wall of that addition next to a window opening. This porch post is approximately 3.8125 inches square with round beaded corners. While many of the other aspects of the design of this porch behind the log side of the house will be conjectural, we will be able to reproduce our period porch posts based on this original one that miraculously has survived.

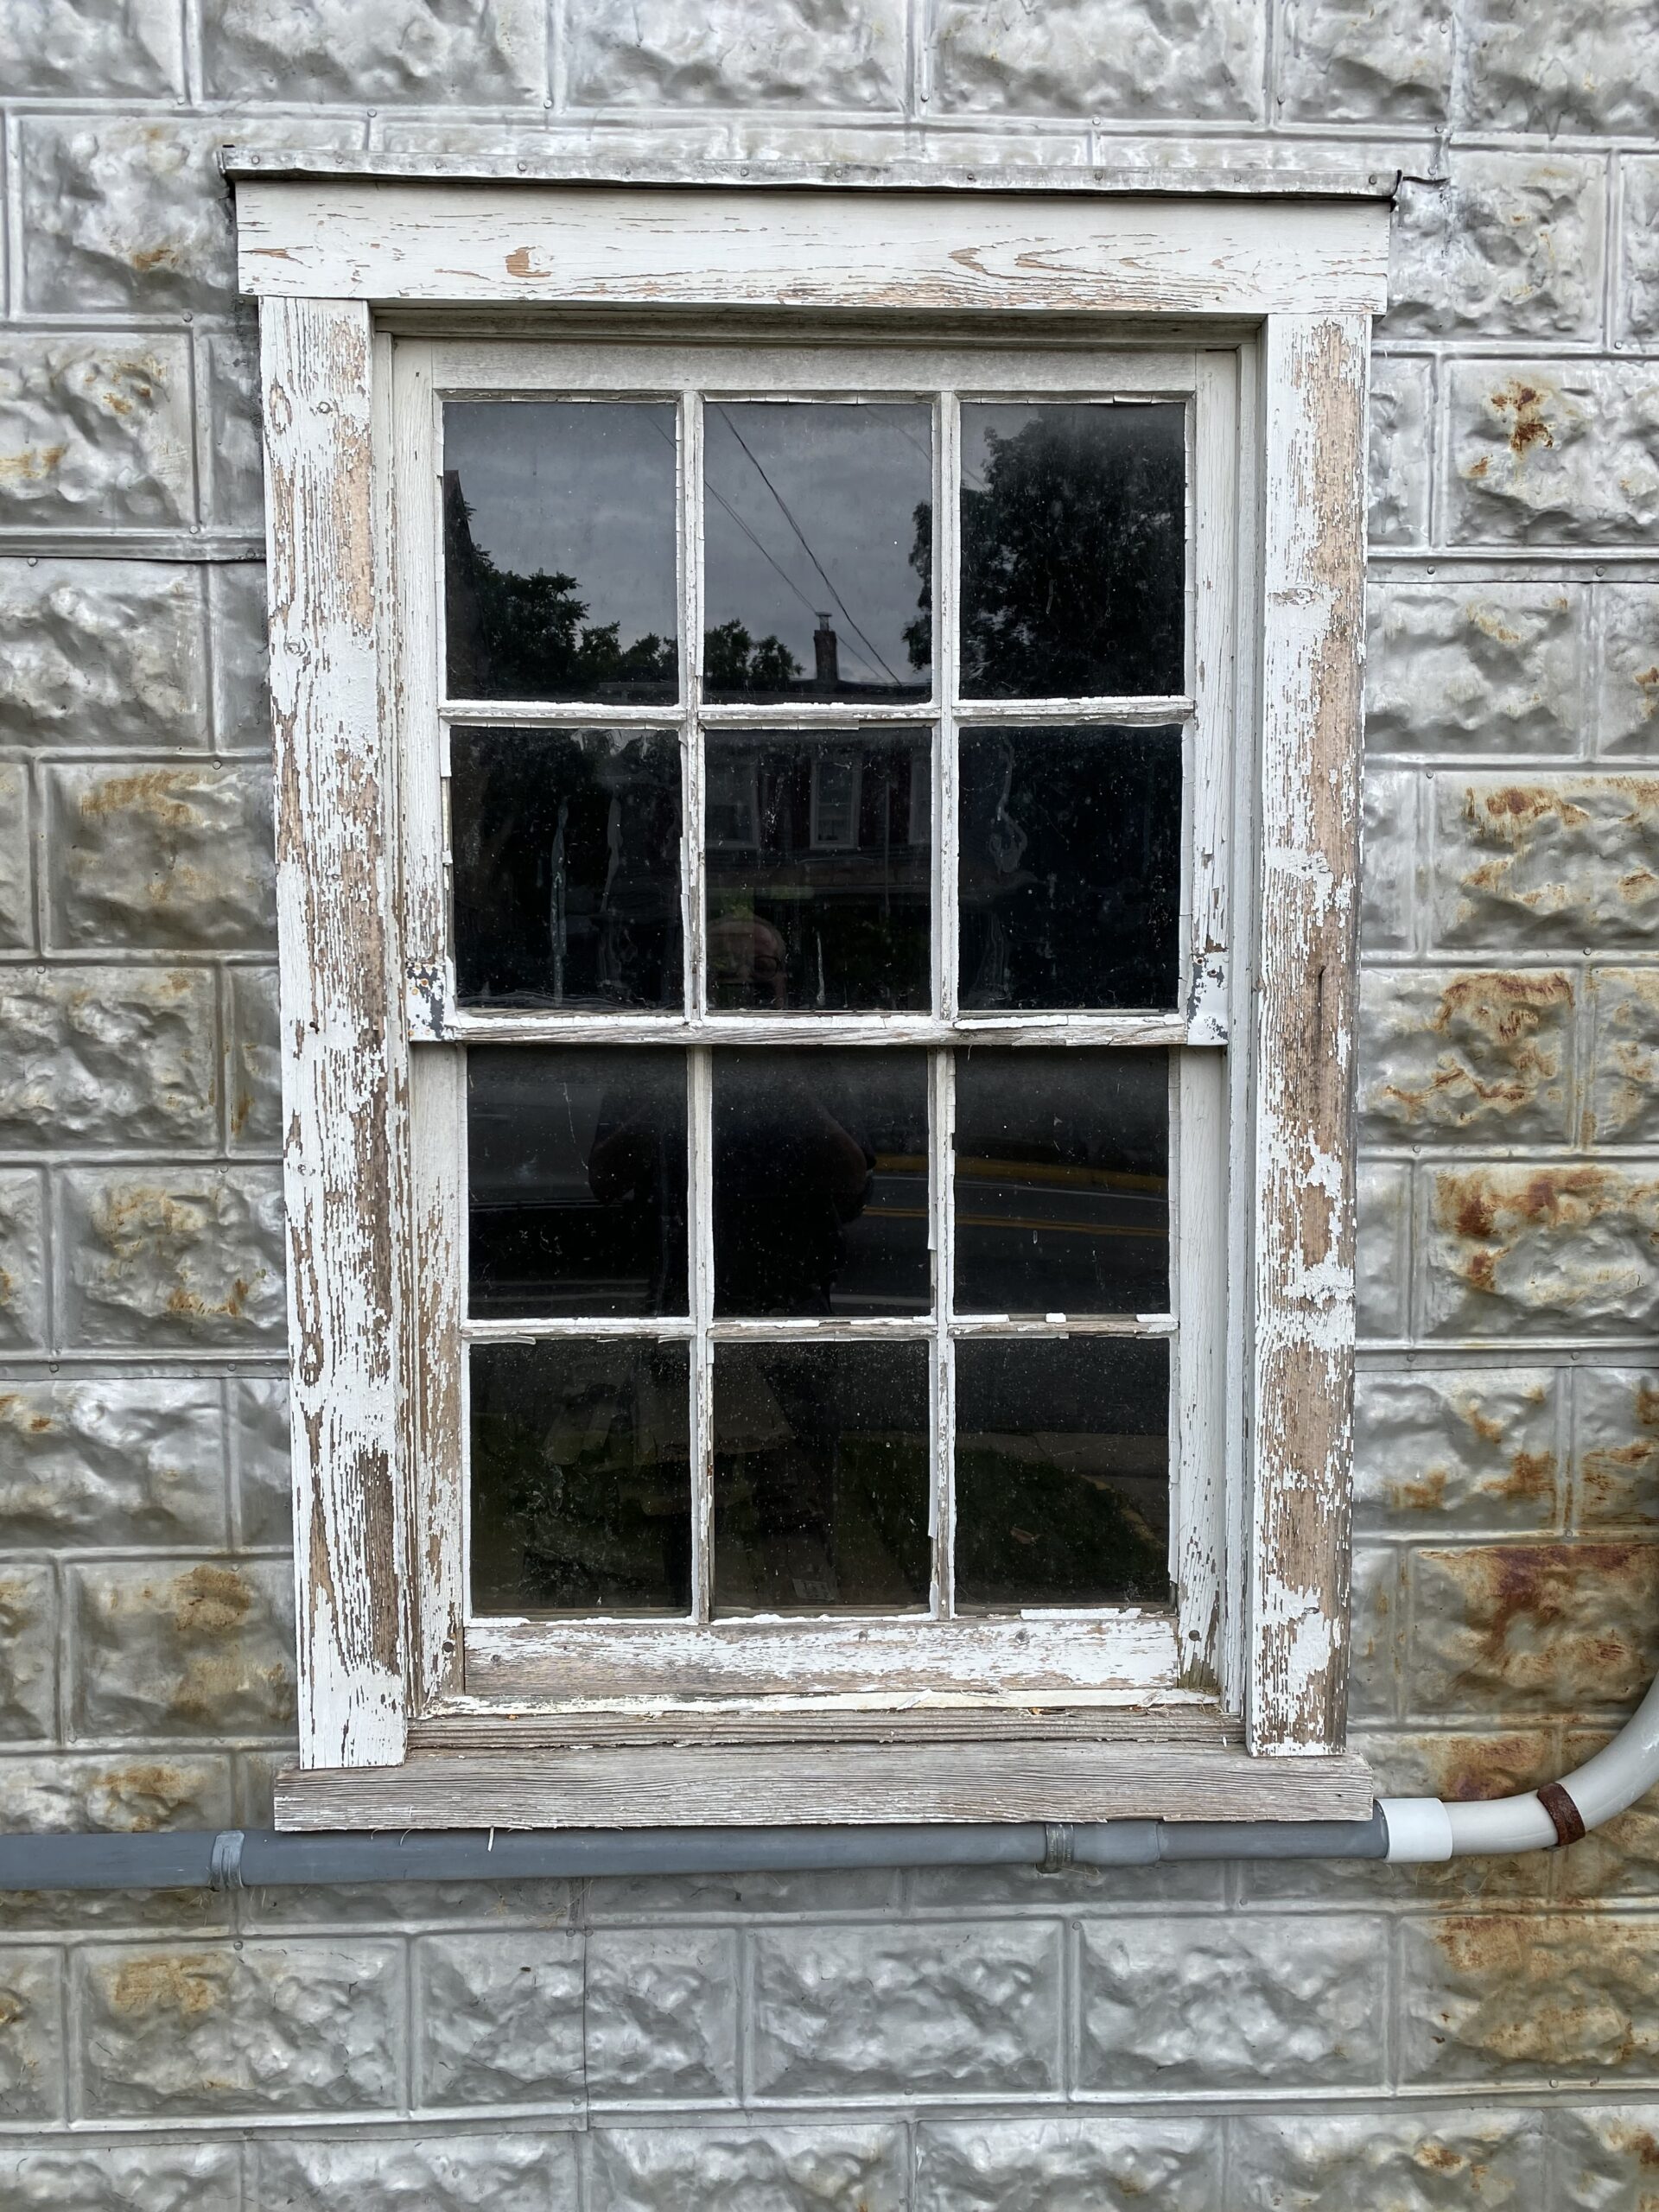
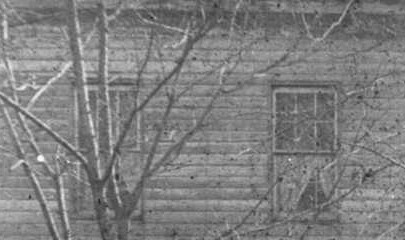
We also have reason to feel fortunate about the second floor windows for the log side of the house. The original six-over- six pane double-hung sash windows were featured in a late nineteenth-century photograph of the log side of the house. (See image below.)

As we have studied the six-over-six pane double-hung sash windows that are installed in the garage next to the log side of the house (see image below), we have come to the conclusion that they originally came from the second floor of the log side of the Stone House. The windows that currently are installed in the second floor of the log side of the house date to the middle of the twentieth century. It appears that when the Argenbrights installed the current windows, they reused two sets of the older windows in the front of the their garage next door. These old window sashes, with their remaining old wavy glass panes, will be removed and safely stored. We will then use them as models for the new reproduction second floor windows on the log side of the house.

Filed Under: Stone House Restoration Project Progress Updates

Planning for the Rear Porch/Buttress

October 8, 2025 By Admin

We have some progress to report on our effort to come up with a design for the rear porch that will serve as a buttress for the east wall of the stone side of the house. The challenge with this undertaking has always been a balancing act. There are three components to balance. By far, the most demanding of the three is the structural requirements for the buttress. The porch must hold the east wall in its current position. This is going to require a steel frame that is built against the wall and welded together in sections to conform to the irregularities of the exterior stone masonry. It will need to have angle brackets and lean-to braces at the base of the uprights that will hold the wall in place. (See image below.)


The other two components of our balancing act are the archeological evidence we discovered behind the stone side of the house and circa 1830 historical architectural forms. Many of our newsletter readers will recall our articles in 2020 when we addressed the archeological discovery of postholes in the places we might expect to find them for wood uprights set in the ground as part of a foundation for a rear porch. The postholes contained backfill with artifacts dating to the first half of the 1800s. The problem is that wood posts set in the ground will rot and will not work with the steel frame we need to support our troubled eastern stone-masonry wall.

Thus, the third component of our balancing act comes into play. We are using circa 1830 historical architectural forms to design a porch with brick-masonry piers to hide our steel frame. It is a historically sensitive conjectural compromise designed to save the original east wall of the Stone House. To conceal the angle brackets and lean-to braces at the base of the uprights that will hold the wall in place, we will be using latticework. (See image above.) We know that latticework was used as early as the 1700s. An eighteenth-century door from Delaware with hand-forged nails in the collection of Colonial Williamsburg is surviving proof of this fact. (See photo below.) As we move forward with our design project we will continue to balance these three components and share the results with you.

Photo above courtesy of Matthew Webster, the Colonial Williamsburg Foundation

Filed Under: Stone House Restoration Project Progress Updates

Completion of the Gutters and Other Progress

January 28, 2025 By Admin

We are happy to report that we have gutters on the Stone House. In an earlier post on the 31st of October 2020 we addressed historical gutters and the brackets that were used in the period to hold them in place. On the 8th of October 2021 we posted on how we installed the gutter brackets prior to the installation of the shingles. With the crown and eaves painted, we finally were able to start getting those gutters installed on the 25th of November 2024. We would like to thank James Loveless of the firm Loveless & Mabe Inside Out Repairs & Guttering, LLC for his assistance and patience over the last four years as we completed the work that needed to be done prior to this final part of the project being finished. This phase concludes what we have affectionately called the “Lid Job” for the Stone House Restoration Project.

Photo above courtesy of James Loveless

We used wires looped around each end of the cups in the gutter brackets to hold the gutters in place. The gutter sections were soldered together as were the downspout sections at each corner. This method will ensure that the gutters will stay in place during weather events with high winds.

This gutter system employs the basic technologies that were available in the 1830 period, with a few exceptions. We used mild steel instead of wrought iron to make the gutter brackets. The gutters themselves are copper coated with FreedomGrey® by Revere. This will ensure they last longer than galvanized steel coated with the same material. For all intents and purposes, they look just like the terne metal (sheet iron coated with an alloy of lead and tin) gutters that were commonly used in that period. To prevent bimetal corrosion between the gutters and the brackets, we had the brackets powder coated. We also used wire with black rubber insulation as a buffer between the gutters and the steel wires.

Additionally, we have an update to report on the progress we have made with our rear porch/buttress design project. On the 6th of September 2024 Ken Livingston of Main Street Architecture in Berryville, VA and Alicia McCormick of McCormick Engineering of Shepherdstown, WV made a site visit to study the east wall of the stone side of the structure. Ms. McCormick made a second site visit on the 25th of October 2024 to assess issues with the floor joists that rest in masonry pockets of that east wall. We look forward to sharing more about these plans for the porch/buttress when they are complete.

Filed Under: Stone House Restoration Project Progress Updates

Painting of the Soffit and Crown

November 16, 2024 By Admin

On October 3rd Vintage, Inc. began the priming of the soffit and crown of the Stone House. (See image below.) This is no ordinary paint job. As we explained in our previous issue, the crown molding, soffit, and top weatherboard on the log side of the Stone House are original and date to when the log side was raised to its current height in 1804. Because of this we have been extra careful with the way we treat these features.

In previous issues we have made mention of our use of linseed oil paint on the shingles we installed over the two sides of the Stone House, and we discussed its benefits and historical applications. In this post we will go into more depth on the subject of linseed oil paint and the reasons why this paint job will not only protect our original wood features but also survive the test of time. 

Many of us who are in the historic architecture preservation business have been coming to the consensus that modern paints are the cause of serious deterioration in exterior woodwork on historic properties. The fact that the historic woodwork in question was originally harvested from old-growth forests during the eighteenth and early nineteenth centuries makes this discovery even more distressing. The evidence is showing that for over a hundred years during the time that linseed oil paints were being used, this exterior woodwork remained in relatively good condition even though it was being exposed to the elements. During the 1930s we start to see true linseed oil-based paints being infused and eventually replaced by synthetic resin alkyd paints derived from petroleum-based chemical ingredients. As the environmental and cleanup concerns mounted over these alkyd paints, acrylic paints were chosen as a “better” alternative. With their faster drying time and easier cleanup, latex or acrylic paints quickly became the new standard. These paints are essentially plastic that encapsulates a wood surface. This sounds great until you realize that water eventually finds a way behind that plastic coating and gets trapped. Trapped moisture in any wood, no matter what its species or quality, causes rot. As the wood rots the paint begins to flake. The painted surfaces that do not flake wear out from ultraviolet light damage. In five years, you are back to scraping, sanding, and painting again. This gets expensive. Never mind the fact that you are also having to sometimes replace rotted wood. One of the few benefits of plastic paints is that they stretch as the wood behind them expands and contracts, shifts, or settles.  Even so, these plastic paints do not penetrate the undelaying wood surface, which remains hygroscopic (able to absorb moisture from the environment). As a result, the wood becomes vulnerable to deterioration from within.

The benefits of linseed oil paint make it clear why it has been used for architectural applications since ancient Roman times. Linseed oil has lower surface tension than water. This makes linseed oil paint able to penetrate farther under the wood surface. As a rule, this type of paint is absorbed deeper into the wood than water-based paints are able to reach. Moreover, linseed oil itself naturally repels water. Linseed oil paints do not form a watertight surface like plastic paints. Instead, they allow what little moisture that does get into the wood to evaporate out through the painted surface. Because of this water never gets trapped under the painted surface of the wood. Unlike acrylic and alkyd paints which require scraping, chemical stripping, and sanding as they crack and flake off, linseed oil painted surfaces are much more maintainable. As the linseed oil dries out of the painted surface, typically over the course of around five years, the pigment takes on a matte or chalky appearance. Even at this point the wood surface is still protected by the oil remaining in its subsurface. The cosmetic quality of the painted surface can be renewed by brushing on a thin coat of pure boiled linseed oil or adding a thin new coat of the same linseed oil paint. Because linseed oil paint does not loosen, crack, flake, or peel, it does not need to be scraped, stripped, or sanded before a new coat of it is applied. Nevertheless, when you apply linseed oil paint over surfaces previously painted with acrylic and alkyd paints (as we are doing with this project), it is best to prepare the surface by removing as much of the old paint layers as possible. To learn more about linseed oil paints and if they might be right for your projects, see “Resurrecting Linseed Oil Paint” by Justin Fink in the October 2024 issue of Fine Homebuilding. Our thanks to David Logan of Vintage, Inc. for sharing his knowledge on this subject.                 

Filed Under: Stone House Restoration Project Progress Updates

Painting Preparations for the Crown Molding

August 17, 2024 By Admin

On May 28th Mr. James Magill, proprietor of Eco Valley Blasting of Woodstock, Virginia, began the surface preparation treatment of the surviving sections of crown molding and soffits on the Stone House. (See photo below.)

To understand the process we are undertaking, we first need to explain the ethics of historic preservation as they relate to our restoration of the Stone House. One guiding principle of an historic restoration project is to preserve as much of the structure’s original fabric as possible. This is especially the case with the parts of the structure that relate to the time period that is the focus of the restoration plan. During our forensic investigation of the exterior of the structure, we discovered that the crown molding, soffit, and the top weatherboard under it on the log side were original to the time when that side of the house was raised to its current height in 1804. Consequently, these features needed to be preserved at all cost. Unfortunately, some of the crown molding had already suffered rot damage many years ago, and those sections had to be replaced with new molding that was an exact copy of the original molding. The original sections of molding, soffit, and top weatherboard that remained had suffered from exposure to the elements and had layers of modern paint over the historical base layers of whitewash and/or white paint. (See image below.)

To ensure the survival of these original sections of crown molding and weatherboards, we will be painting them with a high-quality, linseed oil-based paint. In order to make certain that the new coats of paint will properly penetrate and adhere to the remaining sections of original molding, we need to remove as much of the old paint as possible. Anyone who has any experience with painting knows that it does not matter how good your new paint is. Proper surface preparation is the key to making sure the new coats of paint remain affixed to the surfaces they are supposed to protect. Earlier, our main preservation contractor, Mr. David Logan, proprietor of Vintage, Inc., had conducted experiments to determine the best approach to removing the old paint and preparing the surfaces. He concluded that the most effective way to remove the paint without causing damage to the historical molding was a combination of careful scraping, chemical stripping, and soft-abrasive blasting. After receiving approval from us, he then hired Mr. James Magill to conduct the work.

On June 7th Mr. Magill began to utilize garnet-dust blasting to remove the paint/whitewash that his previous efforts with scraping and using a chemical stripper had failed to eliminate. Wearing protective gear, Mr. Magill carefully sprayed the garnet dust at high velocity over the nooks and crannies of the soffit and crown molding. (See photo above.) There are advantages of using garnet dust. It is safer because it is nontoxic and less abrasive than silica sand. It also produces less dust and can do more with less volume, so it is more cost effective.

Our main reason for wanting to prepare and paint the crown and soffit molding at this time is because our next step in the project will be the installation of the gutters. After the gutters are installed, access to the crown and soffit molding will be limited and more difficult. In the meantime our focus is on the preservation of this original woodwork under our new roof.

Filed Under: Stone House Restoration Project Progress Updates

Planning for the Rear Porch/Buttress

June 18, 2024 By Admin

Now that we are done with the roof, our next phase of work will involve the restoration of the exterior walls as well as window and door openings on both sides of the structure. We have engaged the services of Main Street Architecture in Berryville, Virginia to produce the plans for this next part of the restoration project. The most important component of this next phase of design work will be the plans for a rear porch that will act as a buttress for the east wall behind the stone side of the house. As some readers may recall, during our archeological investigations in the summer of 2016, we discovered the foundation walls of the detached kitchen that once stood primarily behind the log side of the structure. The south end of that detached kitchen was actually behind the stone side. As we explained in our 2017 summer issue of our newsletter (and in a previous corresponding post), the southwest corner of that detached kitchen was occupying the same space as a later timber-frame shed addition that had been on the rear of the stone side of the house. That discovery made it clear that the timber-frame shed addition postdated our restoration period of 1830, as we knew that the detached kitchen was standing prior to 1843, when it was mentioned in a deed that subdivided the property. With this finding came the realization that there had to have been a porch on the rear of the stone side of the house because of the height of the threshold for the rear door behind the stone side of the house and the ground level of the grade under that doorway. Suddenly a posthole that was discovered by students from James Madison University under the direction of Dr. Dennis Blanton during the archeological investigations he conducted in the late winter of 2015 made sense.


In April of 2020, just as the COVID-19 pandemic was beginning to have an impact on our operations, we published an article about the digs that we had commissioned Rivanna Archaeological Services to undertake in unexcavated areas behind the stone side of the house. During that investigation we discovered more postholes that were clear evidence of a rear porch behind that stone side of the structure. These postholes and other structural evidence in the rear-wall masonry indicated that the porch in question had run along the rear wall of the stone side toward the northeast corner, where that stone wall abutted the rear eastern wall of the log addition. (See architectural drawing above and below provided by Main Street Architecture.)

With the historical existence of the porch now well established, we are in a position to deal with a very serious structural problem in a very practical way. As we addressed in that same newsletter of the spring of 2020, the rear eastern masonry wall behind the stone side is leaning back away from its center of gravity. We currently have a temporary buttress supporting that wall so that it remains stabilized. That temporary buttress will need to be carefully replaced by a steel frame designed in such a way as to double as the bones of the historically appropriate reconstruction of the rear porch. The trick will be designing this rear porch/buttress in a way that will meet the structural-engineering requirements dictated by the laws of physics, while allowing it to look like a porch dating to the late eighteenth or early nineteenth century. The practical demands of this structure are complex. The steel frame will need to be diminutive enough to allow it to be sheathed completely in wood framing that appears historically accurate. At the same time, the steel will need to be thick enough to support the masonry wall that will lean against it. We have been studying surviving historical porches as well as depictions of porches in historical photographs, paintings, and drawings. In the coming months we will keep you posted on our progress with this job.

Filed Under: Stone House Restoration Project Progress Updates

Painting the Log Side Roof

November 27, 2023 By Admin

On Monday, the 9th of October, the painting of the shingles over the log side of the Stone House began. In our post titled “Roof Completed Over the Stone Side” from December of 2021 we addressed the historical and practical reasons for painting the shingles on the roof over the Stone House. In this article we will discuss the mixture of paint and copper naphthenate we are using to coat and preserve our shingles.

The base of this paint is Ottosson Linseed Oil Paint in the Iron Oxide Minimum color. The preservative qualities of linseed oil when applied to wood have been known for centuries. It seals the grain, repels water, and protects it against the harmful impacts of humidity and dirt. At the same time it allows the wood to breathe and acts as a repellant to insects and fungi. Linseed oil is extracted by pressing the dried, ripened seeds of the flax plant. Until the mid-twentieth century when synthetic resin, acrylic, and latex paints become more available, linseed oil-based paints were the ones most commonly used for coating wood surfaces. Linseed oil paint should not be confused with paints that used lead oxide as a pigment and as an ingredient for wood preservation. Lead paint is a whole other topic which we will not discuss here. One of the greatest benefits of linseed oil-based paints is longevity. It can last fifteen or more years without maintenance. It does have some limitations and drawbacks, but for our purpose of coating and preserving hand-split red oak shingles, it is truly a remarkable product. For more on linseed oil paint see “Linseed Oil Paints and Mastics Applications and Limitations” by Peter Kaczmar on the buildingconservation.com website, which is maintained by Cathedral Communications Limited in Tisbury, Wiltshire, United Kingdom.

The other ingredient in our paint is copper naphthenate. Sometimes nicknamed CuNap, it is a wood preservative that makes it less palatable to wood-destroying organisms. Naphthenate is one of the carboxylic acids naturally occurring in crude oil, and CuNap is the copper salt of naphthenic acid. It is what the greenish tint in pressure-treated wood comes from. As we have said previously, it is a modern compromise to help ensure the longevity of our very expensive split-wood shingle roof.

The formula we use to mix these two ingredients was given to us by our consultant, Mr. James Huston, who is retired from the Pennsylvania Historic and Museums Commission. Mr. Huston had years of experience in his career installing and caring for side-lap shingle roofs like the one over the Stone House. The mix we are using is one part copper naphthenate to around three parts of linseed oil paint. This ensures that the red oxide color is not diluted or made to appear less like the red oxide paints used historically to coat wood-shingle roofs in the eighteenth and nineteenth centuries. We are applying two coats to the roof over the log side and one fresh coat to the roof over the stone side. The stone side roof had received two coats shortly after it was installed in 2021. With the shingles over both sides of the house painted, our next step will be to install the gutters. After that we will begin the final phases of the exterior restoration of the house. We hope they will go more quickly than this roofing phase has gone. Thanks is extended to our supporters for their patience.

Filed Under: Stone House Restoration Project Progress Updates

The Roof Over the Log Side

September 16, 2023 By Admin

On the 3rd of June 2023 at approximately 1:25 pm, the last shingle was nailed up over the south gable end of the log addition of the Stone House. (See image below.) This momentous event was the culmination of over thirty years of research, planning, skilled craftsmanship, and fundraising. This achievement was finally made possible because of cooperation between three different companies. Mr. Frank Stroik, the former proprietor of the Country Homestead in Kreamer, Pennsylvania, was the principal contractor, and it was he and his crew that completed the roof over the stone side in October of 2021. Mr. Stroik has since turned over the reins of that company to his son Caleb Stroik, who also worked on the roof over the stone side. For the roof over the log addition, Frank Stroik was joined by James Robert Mitchell II from Vintage Inc. out of Winchester, VA, as well as Seth Fritz, who, along with his boss Chad Wolbert of Catoctin Valley Roofing, helped to complete the job. (Seth Fritz is featured in the image below nailing down the last shingle.)

One of the benefits of this approach was the dissemination of the skills and knowledge that Mr. Stroik had in regards to the installation of this kind of side-lap shingle roof. We now have two local companies with staff that are able to do repair work on our roofs over the Stone House. On the day that the job was completed, Butch Fravel president of our board of directors, asked that the work crew members sign a shingle that we would keep as a memento of the finale of the project. (See photo below.)

As the newly installed shingles have not yet been painted, they are a bright contrast to the shingles over the stone side that were painted shortly after they were installed in October of 2021. (See photos below.)
One of the things we have learned by our experience with the roof over the stone side of the structure is that after these shingles are installed they shrink a bit, and a few crack or split along the grain. In turn, we are allowing more time before we paint the shingles over the log side of the house to minimize the shrink factor. We are also going to replace shingles that have cracked or split along the grain before they are painted. Additionally, we will apply another coat of paint to the roof over the stone side at the same time for good measure.

As we move forward with the restoration of the Stone House, the maintenance of this two-sided roof will be a necessary part of the work. One of the reasons that side-lap wood shingle roofs are no longer common is that they require maintenance that other roofs composed of more durable materials do not need. Despite its required extra maintenance and the need it has for specialized skilled craftsmen to conduct the repairs, these roofs over the two sides of the Stone House are a great achievement and a remarkable educational resource for all to enjoy.

Filed Under: Stone House Restoration Project Progress Updates

The Log-Side Shingle Installation

June 17, 2023 By Admin

Sometimes, when you make a plan and you think you have all your ducks in a row, stuff happens. It seems that with the Stone House roof project, we have suffered more than our share of setbacks. We have been poised to finish the roof over the log side of the house since last fall. Between scheduling conflicts with our installation contractor and the weather, the plans were deferred until this spring. When we finally got everything ready to start the job, we discovered that the cypress wood we had stored for the skip sheathing (also called roof lath) had a fungus problem, and we had to locate more to replace it.

The reason we are using cypress wood for the roof lath is based on the advice we received from our consultant, Mr. James Houston, who is retired from the Pennsylvania Historic and Museums Commission. His experience with side-lap shingle roofs like the one we are installing on the Stone House caused him to realize long ago that the inevitable repair required is much easier when a roof’s lath boards are not hardened and rigid. Most types of wood commonly used for roof skip sheathing grow hard and rigid over time as they are exposed to temperature extremes and the elements. Cypress does not age this way but remains relatively easy to drive a nail into it when a shingle needs to be replaced. We now have our cypress skip sheathing installed.


Mr. Houston also recommended that we install hardware cloth over the skip sheathing as a way to keep animals like squirrels and other critters from getting into the roof structure and building nests. Due to the nature of wood shingles, animals have been known to exploit small openings that occur over time and have even been known to chew holes to enlarge them for greater ease of access. The use of hardware cloth is a modern trick that will be invisible from the outside of the house once the roof shingles are installed. It will help preserve the roof as well as the historical fabric of the roof structure. We also will be installing a material called Cedar Breather® by Benjamin Obdyke, which is a modern crenulated mat that creates breathing space for continuous airflow between the bottom roof lath over the eaves and shingles above. Once again, this bit of contemporary technology will help preserve the roof and the historical fabric that is beneath it.


On the 18th of May 2023 our contractors started installing the shingles over the log side of the Stone House. (See images above and below.) For those readers that do not live locally and who cannot drive by the Stone House and see what has happened, the last shingle was installed over the log side on the 3rd of June 2023. The next step will be getting them painted. We look forward to sharing the images of the finished product in our next post. Good things come to those who wait.

Filed Under: Stone House Restoration Project Progress Updates

The Preservation Trades Challenge

January 4, 2023 By Admin

We had hoped to be reporting in this update on the completion of the installation of the roof over the log side of the Stone House. For the majority of time we have been working on this project our progress was held back by the slow pace of the shingle production. It takes a long time to make 4,900 shingles by hand when you have a shortage of hands that are willing and capable of that kind of work. As we reported in our last post, we now have all the shingles we need to install the roof over the log side of the building. This time we are held up again by a shortage of what might be called “low-tech” skilled labor. This term low-tech may sound sarcastic and disdainful but in fact it is quite the opposite. The kind of laborers needed for low-tech preservation trade work are an exceptionally rare group of people who are required to acquire and hone very specialized hand skills. Hand-guided and hand-powered tools are considered low tech in our modern world of power tools and machinery that is designed to get jobs done quickly and efficiently. Prefabricated, mass-produced, and interchangeable building materials are now the standard in the building trades. David William Pye (18 November 1914 – 1 January 1993), was Professor of Furniture Design at The Royal College of Art in London, UK from 1964 to 1974. He identified and contrasted the two basic types of workmanship that are required for all trades: the workmanship of risk verses the workmanship of certainty. Pye defined the workmanship of risk as “workmanship using any kind of technique or apparatus, in which the quality of the result is not predetermined, but depends on the judgment, dexterity, and care which the maker exercises as he works.” The progress of technology throughout history has been a sustained effort to move away from the workmanship of risk toward the workmanship of certainty. To say it plainly, historic preservation trade work requires people to have knowledge and skills that are considered by the for-profit construction business world to be largely obsolete technologies. The installation of side-lap handmade split shingles might be considered the epitome of the workmanship of risk.

The photos that accompany this article were taken in late September 2021 when our roof installation contractor, The County Homestead, was working on the roof over the stone side of the building. Our Manager of Collections & Programs, Rick Kriebel, worked for this company in 2015. He recounted the following: “The first job I had out of grad school was working for The Country Homestead, our current contractors to install the roof. They had a longstanding agreement with the State of Pennsylvania to hire interns every summer and train them in historic construction methods; I was one of two interns that year. I quickly learned that I am even worse at working with my hands than I thought. By the end of the summer half of my duties were some variant of gofering. The other intern had a job lined up somewhere else, and left before the internship was over. Most of the crew were guys with a construction background who learned historic methods on the job. Six years later, when The Country Homestead came to install the first half of the roof I expected to see some old colleagues, but the only ones still around were the owners. Everyone else had left for some reason or another.”

This anecdote illustrates the challenge of the building preservation trades. Mr. Frank Stroik, the proprietor of The Country Homestead, had all his work crew leave at the end of the summer of 2022 to pursue other opportunities. At the time of this post, he is looking to hire and train new workers. If you or someone you know is interested in this kind of low-tech work, please give us a call and we can get you or your friend in touch with Mr. Stroik. In the meantime Mr. Stroik is hoping to have his work crew back up to full strength by the spring on 2023 and plans to come and finish the job of shingling the Stone House roof at that time.

Filed Under: Stone House Restoration Project Progress Updates

  • 1
  • 2
  • 3
  • …
  • 5
  • Next Page »

Stone House Restoration Project Progress Updates

  • Porch Posts and Windows
  • Planning for the Rear Porch/Buttress
  • Completion of the Gutters and Other Progress

Upcoming Events

What We Do

With the town of Stephens City as its focus, the Foundation seeks to interest and engage residents, visitors, scholars and students in the events, lifeways and material culture of the region. We also strive to promote the preservation of the buildings, artifacts and landscapes that are associated with the history of the town of Stephens City.

Current Hours of Operation

For current hours of operation please click here.

History Center Location

PO Box 143 (USPS Mail)
5408 Main Street (FedEx/UPS Deliveries)
Stephens City, VA 22655-0143

Phone: (540) 869-1700
E-mail: info@newtownhistorycenter.org

More Information

Copyright © 2025 Newtown History Center